iOS Development - An introduction to Storyboard Part 1
Dec 2, 2017 iOS 中文版
Storyboard has been introduced for a while, and it’s a great feature for developers. So, as a developer, it would be helpful if you can build a basic understanding of Storyboard before you start coding. In this post, I’m going to walk you through couple things to help you understand Storyboard.
What is a Storyboard
Before we dive into it, let’s take a closer look at what happens when your application starts. Once your iOS app starts, the system is going to read values in the Info.plist, an configuration contains essential information, for initialization. It tries to find out the name of your Storyboard from the config and load it. Now, create a single page app using Xcode, and open the Info.plist. You will find a key named Main storyboard file base name, and the value of it is Main. It means the system is going to load a Storyboard named Main.storyboard after it successfully retrieve the value from the config. The concept looks like this:
 OK, let’s get more detailed information. Open Xcode and create a Tabbed application, then select the Main.storyboard. Now, you should be able to see an arrow pointing to a scene (it’s labeled as Tab Bar Controller), which means this is the entry point of this application. It looks like below:
 You probably notice the arrow is draggable, so yes you can drag and make it point to any scene you want. If you have a more complex application, you might need add more scenes to your Storyboard. Therefore, your application might look like this:
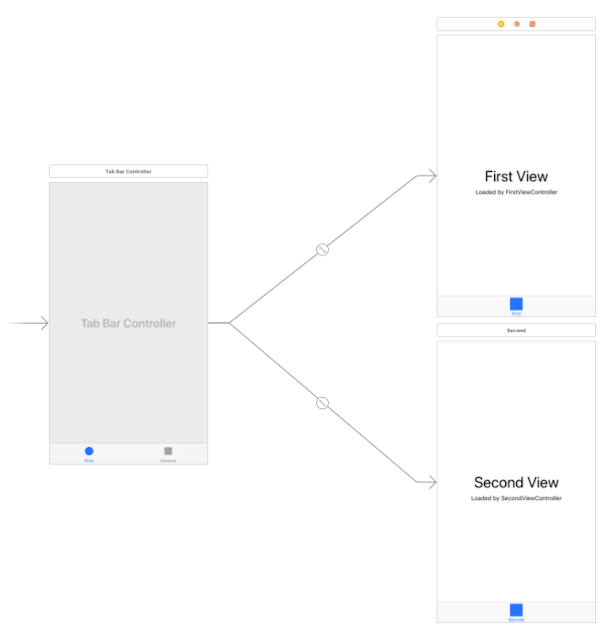 Picture above shows there are two different scenes for users to switch, and lines between the entry point and scenes describe relationships (or transitions) between scenes. In iOS development world, relationship (transition) between different scenes is called Segue. Now, you’ve learned the basic concept of Storyboard. So, what is a Storyboard exactly? In my opinion, Storyboard is a feature that visualizes an application’s design and flow, and it also simplifies the design process.
What is a view controller
In the paragraph above, I’ve mentioned scenes many times. In fact, each scene is built on top of a View Controller. You can think it as a container. A scene is composed of a lot of components like buttons, labels and inputs, and we put them into a container: View Controller. By using it, we can manage those components at a granular level.
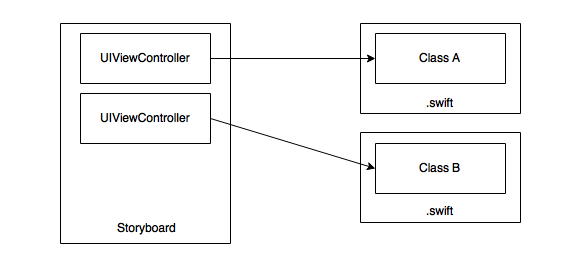
But how to configure or control a view controller through codes? To achieve that, we can create a Swift file, and add a Class into it. After that, open Main.storyboard and select a view controller (scene). In the identity inspector, set it’s Class to the Class you’ve added in the Swift file like this:
 After reading this post, I believe you already have a stronger understanding of Storyboard. I will drop more detailed information in the following posts. Hope this post is helpful to you. Go to read iOS Development - An introduction to Storyboard Part 2.
You might also like:
If you have any suggestions, questions or even find some typos, feel free to contact me. Thank you! :)
zeckli.devforgalaxy@gmail.com © 2015-2019 zeckli, thanks to Jekyll and GitHub.